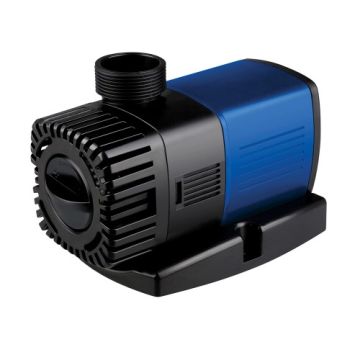
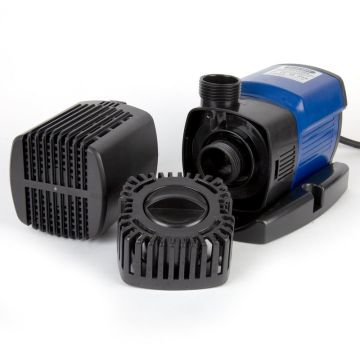
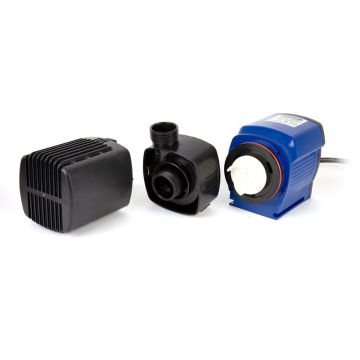
PondMAX Impeller and Shaft assembly to suit EV Series submersible pond pumps
Availability: In stock
Stock Availability:
4
SKU:
PMX-EV-IMPELLER
$51.35
Impeller and Shaft assembly to suit following PondMAX EV Series pumps :
- PondMAX EV1900
- PondMAX EV1910-DC
- PondMAX EV2900
- PondMAX EV2910-DC
- PondMAX EV3900
- PondMAX EV3910-DC
- PondMAX EV4900
- PondMAX EV4910-DC
- PondMAX EV7200
- PondMAX EV9200
- PondMAX EV11200
- PondMAX EV13600
![]()
As established brand by the global leader, Aquatec Australia, PondMAX offers an affordable yet resilient DIY range.
Rock Around The Block is proud to be an authorised dealer for PondMAX product range.
Impeller and Shaft assembly to suit following PondMAX EV Series pumps :
- 12EV025 : PondMAX EV1900
- 12EV025 : PondMAX EV1910-DC
- 12EV026 : PondMAX EV2900
- 12EV026 : PondMAX EV2910-DC
- 12EV027: PondMAX EV3900
- 12EV027 : PondMAX EV3910-DC
- 12EV028 :PondMAX EV4900
- 12EV028 : PondMAX EV4910-DC
- 12EV029: PondMAX EV7200
- 12EV030: PondMAX EV9200
- 12EV031: PondMAX EV11200
- 12EV032: PondMAX EV13600
Specification & Features:
- This impeller assembly is suitable for PondMAX EV Series and PondMAX Low Voltage EV Series submersible pumps
- Open Vane Impeller design – Handles large soft sediment particles up to 4mm in size
- Long life impeller design - Plastic encapsulated impeller parts with Ceramic shaft
- Self-Lubrication by water
- The assembly includes shaft, washers & rubber bushes
- This impeller has no exposed metal parts and hence may be used in salt water applications.
Recommendations:
- It is recommended to replace the Impellor and Shaft every 12-18 months.
- When in use, the Pump must always be fully submerged in water and should be placed on a stable surface. Care must be taken to ensure that pump is deep enough inside the water body to not suck air from the surface. Suction of air by the water pump is called Cavitation and is one of the most common causes of premature impeller wear.
- The impeller and shaft assembly of a pump is a wearing consumable part. Regular inspection, cleaning and maintenance will ensure longer service life of the impeller and of the pump.
- A worn or damaged impeller should be replaced. Failure to do so may result in serious damage to the pump.
Steps to inspect / replace the impeller:
- Disconnect the power cord from the power supply and take the pump unit out of water after detaching tubing and/or fountain kit
- Remove the filter case
- Unclip the snap-fit catch under the base plate and take off the base plate
- Remove the impeller cover by turning it in anti-clockwise direction
- Lift out the impeller assembly. Care must be taken to ensure that the Ceramic shaft is not broken, as they are brittle. The black disc behind the blades is a part of the impellor assembly.
- Clean the impeller and check for any signs of wear & tear or damage. Replace the impeller if needed.
- Carefully slide back the impeller into the motor body. The impeller will seat itself back in due to magnetic force.
- Replace the impeller cover and rotate clockwise to lock back into position.
- Reattach the sliding base plate and pump filter case
- Reattach the tubing and/or fountain kit
- Place the pump back inside the water body and connect back power supply.
Write Your Own Review